こんにちは。フロントエンドエンジニアの渡邉です。 先日参加した勉強会でAWS AmplifyについてのLTを聞き、興味が湧いたので、実際に使ってみました。 その詳しい内容と感じたことについて紹介します。
目次
- Amplifyとは
- Amplifyによる公開
- セットアップ
- 実装
- Webアプリを公開
- AppSyncとは
- AppSync導入
- queries
- mutations
- おわりに
Amplifyとは
AWS を使用したスケーラブルなモバイルアプリおよびウェブアプリの作成、設定、実装を容易にします。Amplify はモバイルバックエンドをシームレスにプロビジョニングして管理し、バックエンドを iOS、Android、ウェブ、React Native のフロントエンドと簡単に統合するためのシンプルなフレームワークを提供します。また、Amplify は、フロントエンドとバックエンドの両方のアプリケーションリリースプロセスを自動化し、機能をより迅速に提供することができます。
Amplifyによる公開
今回はReact + AWS Amplifyを使って認証付きの、シンプルなWEBアプリを作成、公開してみます。
事前に以下の準備が必要です。 - Amplify CLI のインストール - AWSアカウント設定
セットアップ
まずReactのアプリケーションを作成します。
create-react-app amplify-app
cd amplify-app
次にAmplifyのセットアップです。
amplify init

? Enter a name for the project amplify-app
? Enter a name for the environment prod
? Choose your default editor: Visual Studio Code // 普段使用しているeditor
? Choose the type of app that you're building javascript
Please tell us about your project
? What javascript framework are you using react
? Source Directory Path: src
? Distribution Directory Path: build
? Build Command: yarn build
? Start Command: yarn start
Using default provider awscloudformation

For more information on AWS Profiles, see:
https://docs.aws.amazon.com/cli/latest/userguide/cli-multiple-profiles.html

? Do you want to use an AWS profile? Yes
? Please choose the profile you want to use amplify-test // Amplify用のIAMアカウント
認証機能を導入します。 今回はすべての項目でデフォルト値を使用します。
amplify add auth
...

amplify push
amplify push コマンドで追加した機能を有効化させます。
実装
yarn add aws-amplify aws-amplify-react
src/App.jsを以下のように編集します。
import React from 'react';
import Amplify from 'aws-amplify';
import awsconfig from './aws-exports';
import { withAuthenticator } from 'aws-amplify-react';

Amplify.configure(awsconfig);

const App = () => {
  return (
    <div>
      amplify-app
    </div>
  );
}

export default withAuthenticator(App, true);
Webアプリを公開
ここでもすべての項目でデフォルト値を使用します。
amplify add hosting

? Select the environment setup: DEV (S3 only with HTTP)
? hosting bucket name amplify-app-20191126224819-hostingbucket
? index doc for the website index.html
? error doc for the website index.html

You can now publish your app using the following command:
Command: amplify publish
amplify publish &#x2714; Uploaded files successfully. Your app is published successfully http://~~~ ここにアクセス
amplify publishコマンドが成功すると、中身はシンプルですが無事に認証機能付きwebアプリ公開完了です。
今回はホスティングを試すためにHTTPを指定しています。 上記のサイトをみる場合は普段使わないアドレス・パスワードをお使いください。
認証機能を本格的に実装する場合は必ずHTTPSを指定しましょう!
これでセットアップは完了です。 これをベースに簡単なWEBアプリケーションを作っていきたいと思います。 WEBアプリのデータを保存するためにAppSyncも導入します。
AppSyncとは
AWS AppSync を使用すると、1 つ以上のデータソースからのデータに安全にアクセス、操作、結合するための柔軟な API を作成でき、アプリケーション開発がシンプルになります。AppSync は、GraphQL を使用してアプリケーションが必要なデータを正確に取得できるようにするマネージド型サービスです。 AppSync を使用すると、NoSQL データストア、リレーショナルデータベース、HTTP API、AWS Lambda を使用したカスタムデータソースなどのさまざまなデータソース上で、リアルタイムの更新を必要とするアプリケーションを含む、スケーラブルなアプリケーションを構築できます。モバイルおよびウェブアプリケーションの場合、AppSync はさらに、デバイスのオフライン時にローカルデータアクセスを提供し、オンラインに戻るとカスタマイズ可能な競合の解決処理を使用したデータ同期を提供します。
AppSync導入
amplify add api

? Please select from one of the below mentioned services: GraphQL
? Provide API name: amplifyApp
? Choose the default authorization type for the API API key
? Enter a description for the API key:
? After how many days from now the API key should expire (1-365): 7
? Do you want to configure advanced settings for the GraphQL API No, I am done.
? Do you have an annotated GraphQL schema? No
? Do you want a guided schema creation? Yes
? What best describes your project: Single object with fields (e.g., “Todo” with ID, name, description)
? Do you want to edit the schema now? Yes
AWS AppSync APIキーは作成後7日で有効期限が切れます。
初期設定後にAWS AppSync認証タイプを変更する場合はamplify update api コマンドを実行します。
amplify update api

? Please select from one of the below mentioned services: GraphQL
? Choose the default authorization type for the API (Use arrow keys)
❯ API key
Amazon Cognito User Pool
IAM
OpenID Connect

// 以下省略
amplify pushコマンドを実行して、バックエンドにAPIを構築します。
そのあとにいくつか質問されますが、全てEnterでいきます。
amplify push

current Environment: prod

| Category | Resource name | Operation | Provider plugin |
| -------- | ------------------ | --------- | ----------------- |
| Api | amplifyApp | Create | awscloudformation |
| Auth | amplifyappf9e59d08 | No Change | awscloudformation |
| Hosting | S3AndCloudFront | No Change | awscloudformation |
? Are you sure you want to continue? Yes

The following types do not have '@auth' enabled. Consider using @auth with @model
- Todo
Learn more about @auth here: https://aws-amplify.github.io/docs/cli-toolchain/graphql#auth

GraphQL schema compiled successfully.

Edit your schema at /Users/yuma/workspace/myapp/amplify-app/amplify/backend/api/amplifyApp/schema.graphql or place .graphql files in a directory at /Users/yuma/workspace/myapp/amplify-app/amplify/backend/api/amplifyApp/schema
? Do you want to generate code for your newly created GraphQL API Yes
? Choose the code generation language target javascript
? Enter the file name pattern of graphql queries, mutations and subscriptions src/graphql/**/*.js
? Do you want to generate/update all possible GraphQL operations - queries, mutations and subscriptions Yes
? Enter maximum statement depth [increase from default if your schema is deeply nested] 2

GraphQL endpoint: https://xxxxxxxxxxxxxxx.appsync-api.ap-northeast-1.amazonaws.com/graphql
GraphQL API KEY: xxxxxxxxxxxxxxxxxxxxxxxx
この情報は src/aws-exports.jsに自動的に挿入されます。
Amplify CLIで構築すると、amplify/backend/api/amplifyApp/schema.graphqlにデフォルトでTodoモデルを作成してくれるのでそのまま使います。
type Todo @model {
  id: ID!
  name: String!
  description: String
}
queries
src/graphql/queries.jsに標準的なクエリまで自動生成してくれます。
/* eslint-disable */
// this is an auto generated file. This will be overwritten

export const getTodo = `query GetTodo($id: ID!) {
  getTodo(id: $id) {
    id
    name
    description
  }
}
`;
export const listTodos = `query ListTodos(
  $filter: ModelTodoFilterInput
  $limit: Int
  $nextToken: String
) {
  listTodos(filter: $filter, limit: $limit, nextToken: $nextToken) {
    items {
      id
      name
      description
    }
    nextToken
  }
}
`;
src/App.jsを編集します。
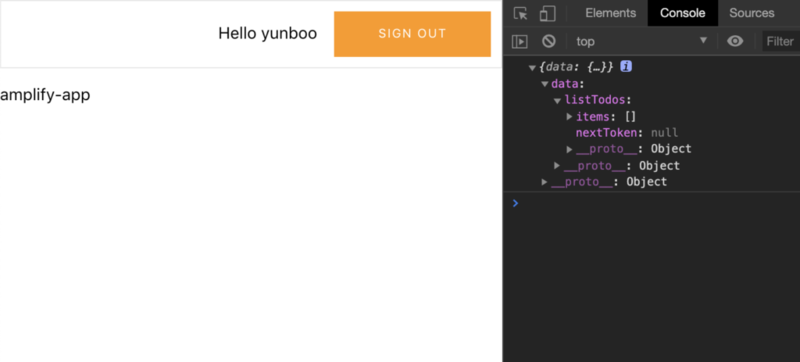
import React, { useEffect } from 'react';
import Amplify from 'aws-amplify';
import awsconfig from './aws-exports';
import { withAuthenticator } from 'aws-amplify-react';
import { API, graphqlOperation } from "aws-amplify";
import { listTodos } from "./graphql/queries";

Amplify.configure(awsconfig);

const App = () => {
  useEffect(() => {
    const getTodos = async() => {
      const todos = await API.graphql(graphqlOperation(listTodos))
      console.log(todos);
    }
    getTodos();
  }, [])
  return (
    <div>
      amplify-app
    </div>
  );
}

export default withAuthenticator(App, true);
何も格納していないので、空ですが無事に接続できました。
mutations
src/graphql/mutations.jsにこちらも自動生成してくれます。
/* eslint-disable */
// this is an auto generated file. This will be overwritten

export const createTodo = `mutation CreateTodo($input: CreateTodoInput!) {
  createTodo(input: $input) {
    id
    name
    description
  }
}
`;
export const updateTodo = `mutation UpdateTodo($input: UpdateTodoInput!) {
  updateTodo(input: $input) {
    id
    name
    description
  }
}
`;
export const deleteTodo = `mutation DeleteTodo($input: DeleteTodoInput!) {
  deleteTodo(input: $input) {
    id
    name
    description
  }
}
`;
src/App.js編集します。
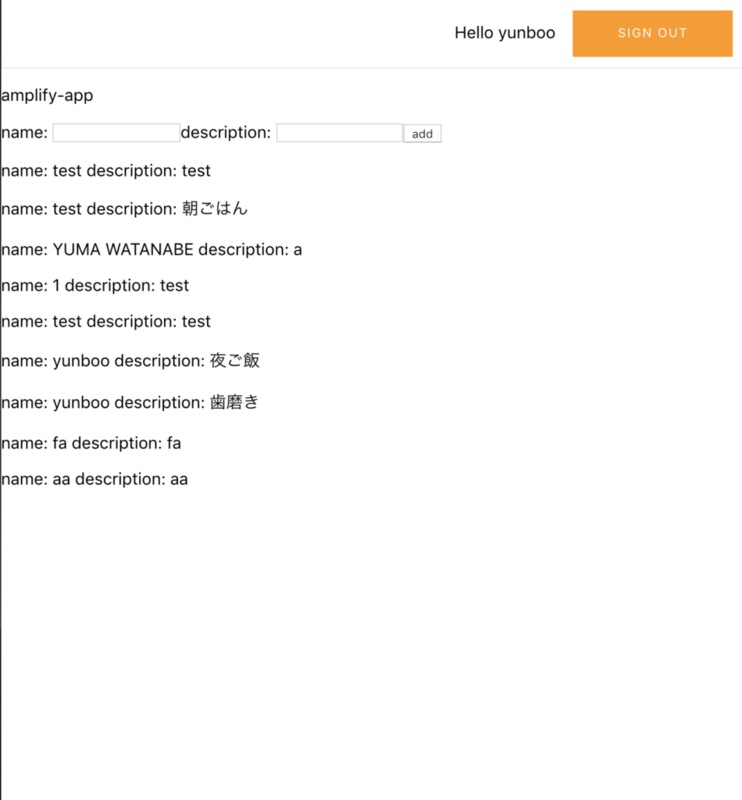
import React, { useState, useEffect } from 'react';
import Amplify from 'aws-amplify';
import awsconfig from './aws-exports';
import { withAuthenticator } from 'aws-amplify-react';
import { API, graphqlOperation } from "aws-amplify";
import { listTodos } from "./graphql/queries";
import { createTodo } from "./graphql/mutations";

Amplify.configure(awsconfig);

const App = () => {
  const [name, setName] = useState('');
  const [description, setDescription] = useState('');
  const [todos, setTodos] = useState([]);
  useEffect(() => {
    const getTodos = async() =>; {
      const { data } = await API.graphql(graphqlOperation(listTodos))
      const { items } = data.listTodos
      setTodos(items)
     }
    getTodos();
  }, [])

  const handleCreateTodo = async() => {
    if(!name || !description) return
    setTodos([...todos, {name, description}])
    await API.graphql(graphqlOperation(createTodo, {input: {name, description}}))
    setName('');
    setDescription('');
  }

  const handleSetName = (e) => {
    setName(e.target.value);
  }

  const handleSetDescription = (e) => {
    setDescription(e.target.value);
  }

  return (
    <div>
      amplify-app
      <label>name: </label>
      <input name="name" type="text" value="{name}" onChange={(e) => handleSetName(e)} />
      <label>description: </label>
      <input name="description" type="text" value="{description}" onChange={(e) => handleSetName(e)} />
      <button onClick={() => handleCreateTodo()}>add</button>
      {todos.map((todo, i) => (
        <p key={i}>name: {todo.name} description: {todo.description}</p>
      ))}
    </div>
  );
}
export default withAuthenticator(App, true);
nameとdescriptionを追加できました。
 今回は
今回はmutaionsで値を格納しただけなので、リアルタイムではありませんがsubscriptionsを使えばでリアルタイムで反映されるのもAppSyncの良いところです。
おわりに
AWSをあまり触ったことがない自分でも簡単に認証機能付きのWEBアプリを公開することができました。
今回使用したauthやapi以外にもamplify add xxx で一部のAWSリソースを使うことができます。
他にも色々触ってみたいなと思いました。
最後に、株式会社スタメンでは一緒に働くエンジニアを募集しています。ご興味のある方はぜひエンジニア採用サイトをご覧ください。